Tutorial - Editing an Existing File
- Do we want to mention opening Audacity projects here? If not, shouldn't the page be called "Editing an Existing Audio File"?
- If we want to discuss per-platform dragging behaviour it gets very complex. Maybe of the detail I added we can do without the para. about dragging to the Dock/Taskbar icon?
The easiest way to use Audacity is to open up an existing audio file and make small changes.
Objective
The objective of this tutorial is to learn how to edit a sound file. To achieve this objective, we are going to open an existing sound file, remove parts of this file, apply a 1-second fade-out at the end, export the results, and play it in your favorite audio player. These steps will introduce the basic steps commonly used when editing a file.
Step 1: Get a file to edit
Audacity can open many common audio file formats, including WAV, AIFF, and MP3. If the optional FFmpeg library is installed, a larger range of formats, including WMA and the audio content of most video files, can be opened. Audacity cannot open copy-protected music files.
Download and use the file fillingstation.mp3
( This file contains a Elizabeth Bishop Filling Station Poem - extracted from http://www.poetryarchive.org/poetryarchive/singlePoet.do?poetId=8982.
download or open the text: Filling Station)
 |
If you click in the links above, they will be opened by the associated programs (ex: itunes, Windows Media Player for the first and Adobe Reader for the second). To download the file to your machine, click with the left button of the mouse. Choose a directory to save. ( In the University Lab, usualy you can save on C:/temp). |
Step 2: Open the file with Audacity
Launch Audacity. To open an audio file, you can select or but a quicker method is to just drag and drop the file as in the following examples:

All three platforms support:
- dragging the audio file into the Audacity window
- dragging the audio file to the Audacity icon on the Desktop.
Step 3: Look at the waveform

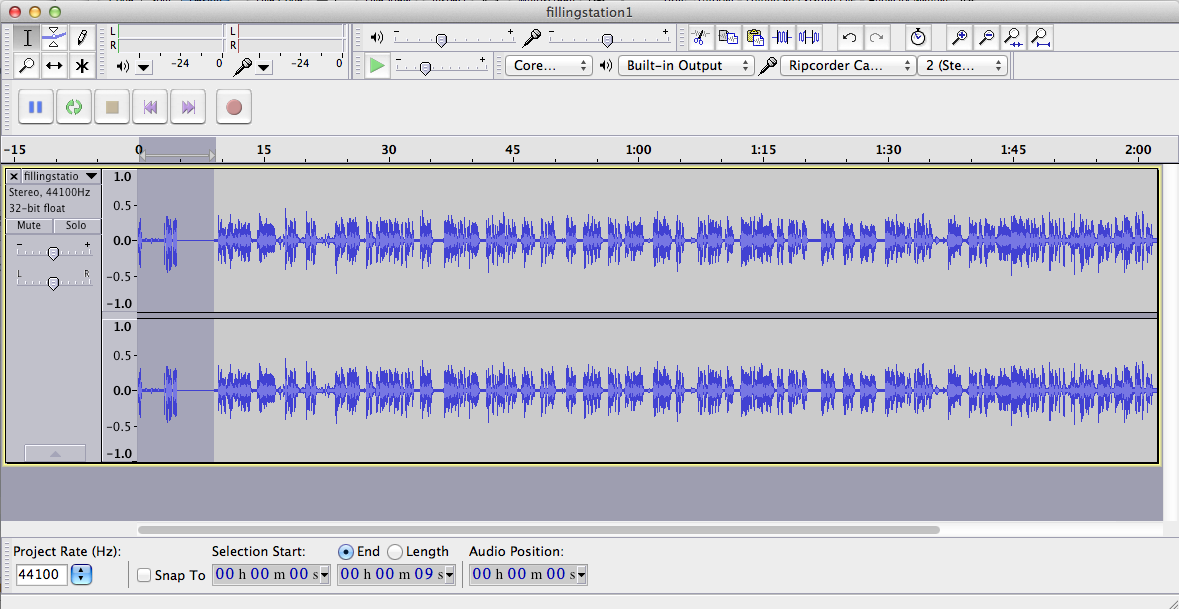
This image shows a stereo waveform. The left channel is displayed in the top half of the track, and the right channel on the bottom. When the waveform is "larger", the audio is louder, and vice versa.
The ruler above the waveform shows you the length of the audio in minutes and seconds.
Removing any DC offset (if present)
DC offset can occur in audio files so that the recorded waveform is not centered on the horizontal line at 0.0 amplitude. It can be caused by recording with a faulty sound card. The example above is centered on 0 correctly and carries no DC offset. If your waveform is not centered, use the Normalize option f to remove DC offset and how to check if your Windows sound device can perform this correction automatically.
Step 4: Listen to the audio file

The image above shows Transport Toolbar.
Click the Play button  to listen to the audio. Click the Stop button
  to stop playback.
Watch out!
|
There is a difference between the Stop button |
 .
.
Step 5: Mark the piece of the audio track you want to delete
You edit audio waveforms in Audacity in much the same way as you would edit text in a word-processing document. When you are editing text you first select the text you want to change and then choose what you want to do with it. You might want to cut or copy the text, delete it, paste new text in its place, or change it to bold. You do the same thing in Audacity: first zoom and select the range of audio you want to change, and then choose what you want to do with it.
The image above shows Edit Toolbar with the Zoom buttons highlighted. This ![]() is the Zoom In tool, and this
is the Zoom In tool, and this ![]() is the Zoom Out tool.
is the Zoom Out tool.
To zoom in to get a closer look at the waveform, first choose the Selection Tool ![]() , then click near the point you're interested in, then click the Zoom In button. Keep clicking the Zoom In button until you see the detail you need. Note that when you click the Zoom In button the cursor is centered on the screen.
, then click near the point you're interested in, then click the Zoom In button. Keep clicking the Zoom In button until you see the detail you need. Note that when you click the Zoom In button the cursor is centered on the screen.
There are also menu commands and keyboard shortcuts for zooming. View > Zoom In (or CTRL + 1) is the same as clicking the Zoom In button. View > Zoom Out (or CTRL + 3) is the same as clicking the Zoom Out button. View > Fit In Window (or CTRL + F) will zoom the waveform so it fits in the window.
Use the Zoom commands so that you can make maximal use of your Audacity window to see as much detail as you need, or to make sure you see the entire file when necessary.
Walk through deleting of selected audio
To cut part of this audio file down , use these following steps.
- Adjust the start and end of the selection with the mouse as follows.
- 5.1. Move the pointer over the start of the selection - the cursor will change to a left-pointing hand.
- 5.2. Click and drag to adjust the beginning of the selection.
- 5.3. You can adjust the end of the selection in a similar manner.
- Note that this is just like selecting a range of text in a word processor

You've now selected the portion of the audio that you want to cut. , click on Edit > Delete.
If you make a mistake, you can always click on Edit > Undo. Audacity has unlimited Undo and Redo. You can undo your editing actions all the way back to when you opened the file. You can also Redo actions that you have undone.
You can also copy and paste a piece of audio at any point of the waveform.
Step 6: Remove all the portions with with an undersired noise or recorded sound you want
There is a part of the narration in which the narrator coughs. Remove this section of the audio track.
Step 7: Fade out the last second
- Click the Skip to End button
 .
.
- Zoom In until you can see the last two or three seconds of the waveform.
- Click in the waveform about 1 second before the end.
- Click on Edit > Select > Cursor to Track End.
- Click on Effect > Fade Out. The last second of the audio is smoothly faded out.
Note that we always select some audio first, then choose what action we want to perform on it.
|
If you have just made a recording it is strongly recommended to it immediately to WAV or AIFF or MP3 ( ideally to an external drive) as a safety copy before you start editing the project. |
Step 8: Export the resulting file
When you save an Audacity project with File > Save Project you are doing just that - saving an Audacity project. Audacity projects can be opened only by Audacity. If you want other programs (such as iTunes or Windows Media Player) to be able to open this file you need to export it.
Exporting a WAV file
- Click on File > Export... - the standard "Save" dialog for your operating system appears.
- Give the file a different name. Audacity always suggests a name for the file that is the same as the name of your Audacity project. It is always best to alter this so you don't confuse your exported file with your Audacity project.
- Choose a location to save the file in the usual manner.
- At the bottom of the Save dialog is a drop-down menu labeled "Format". From this menu choose "WAV (Microsoft) signed 16-bit PCM".
- There are no options for the WAV file format, so there is no need to click the Options button.
- Click the Save button to complete the export of your project to a WAV file.
Exporting an MP3 file
If you are in the University LAB, probably you can export your file to the mp3 format.
( If you are not in the University Lab, in order to export files from Audacity in MP3 format you will need to download and install the optional LAME MP3 encoder. Instructions are here . Once you have downloaded and installed the LAME encoder you will be able to create MP3 files using Audacity).
The steps for exporting a file in MP3 format are the same as for a WAV file, except:
- In the Save dialog, from the "Format" menu, choose "MP3 files"
- Then click the Options button to set the bit rate and other options for the MP3 file.

Step 8 - Testing your new Audio Production
To demonstrate the difference between an Audacity project (the AUP) file, and a sound file you export from an Audacity project:
- Click on File > Close, saving changes if asked.
- Find the AUP file on your computer and attempt to open it with the audio player of your choice (for example iTunes, Windows Media Player). You can't.
- Find the exported WAV file on your computer and attempt to open it with the audio player of your choice. Success!
You can't open an Audacity project in a media player. Only by exporting your project can you listen to it in a media player.
Once you've exported your project you should keep the original project file (AUP) and its associated _data folder around in case you want to make some changes to it in the future.
[ Tutorial adapded from http://manual.audacityteam.org/man/Tutorial_-_Editing_an_Existing_File]